SEARCH
4 items found for ""
- Six Steps to Create a Flower Pot Speedweve Darn
Do you fancy combining Speedweve darning with embroidery? Well if you do then this is an easy project to start off with and the finished result is so sweet! This design can be achieved on knitwear as well as denim and other woven fabrics using yarn or thread, but you'll achieve a much more defined pattern on woven fabrics using cotton thread. For this repair you will need the following: a Speedweve loom thread or yarn - at least 3 different colours a long darning needle a short tapestry needle a pair of scissors a fabric marker pen e.g. air erasable pen, washable marker pen, Frixion pen or Chaco Chalk Pen and a ruler Ok, so let's get going!......... Step One: Marking Out Set up your Speedweve loom over the area in need of repair - this could be a hole, stain or threadbare area. Once your loom is in position we need to begin by marking a pot shape. Firstly draw a horizontal line (A) - this will be the base of your pot so needs to be below the area of damage. Next, draw a vertical line (B) from the base of the centre hook on your loom to the bottom of the wooden disc and intersecting with your first horizontal line. Then make a mark 1cm (C) either side of the point at which the vertical line intersects the horizontal line. Finally draw a vertical line (D) from the bottom of the last hook on the left to line C and repeat the same steps on the right hand side. Alternatively you could cut a shape out of card and draw around the template, just make sure the top of the pot is no bigger than the width of the loom! Step Two: Warp Threads You're now ready to begin warping your loom aka adding in the vertical threads. Thread up your long darning needle and insert the needle into your fabric coming up in the bottom left hand corner of the pot shape. Bring the thread up and to the hook on the far left hand side (or 2nd hook in if this doesn't give you the correct angle) following the diagonal line you marked out. Hook the thread around the hook end and then bring the thread back down to the horizontal line. Insert your needle into your fabric directly next to where you came up and take a tiny pick stitch; you should come up very close to your last stitch. Continue the above steps until you reach the last (or 2nd to last) hook on the right hand side. Your last warp thread should follow the right hand horizontal thread and finish in the bottom right hand corner of the pot shape. When you've added in all your warp threads then remove the needle but leave a long loose thread tail so you can pull on it to adjust the warp tension in the following steps. Step Three: Weft Threads Complete your Speedweve darn by adding in the weft (horizontal) threads. Make sure to take a small pick stitch on each side after you weave each line to anchor your 'patch' to your fabric. If you want your pot to look a bit special then have fun with different colours and weave patterns. Weave all the way to the top just below the hook ends. Step Four: Remove the loom Take off the elastic band or spring holding the disc and metal loom together and carefully remove the loom leaving the disc in place. If you want to keep your fabric a little more secure then pop your elastic band/spring back in position. Next, using a whip stitch sew down the loops at the top of the pot to secure your 'patch' in place; make sure to catch each loop to avoid any distortion to the patch. Step Five: Add a few petals Now you can start adding some embroidery- you might want to use your Speedweve disc or a Mending Macaron at this stage or even an embroidery hoop! Use a duplicate stitch (which is essentially a simple V shape stitch) to embroider some flowers scattered directly above the pot. To make this a little easier I would suggest you mark out the position for each flower as a guideline to work to. At this stage you can play with adding more colour if you'd like to - you could stitch the petals in just one colour or use a mixture of colours. It will look best if you stitch different size flowers to create the illusion that some flowers are at the very front of the pot and others are further away. Stage Six: Adding the stems Finally using a long running stitch embroider the stems of each flower. You will want to bring your thread up from just below the top of the basket and down again at the base of the flower petals. Then bring your needle up at the base of another set of petals and down again just below the top of the basket. Continue until each flower has a stem! To finish your darn remove your disc or hoop (if you used one) and tidy up all the loose threads on the wrong/back side. It's quicker if you use a tapestry needle as these needles have a longer and larger eye and therefore are easier to thread. And there you have it! I hope you love this as much as I do and feel inspired to give it a go :)
- Speedweve FAQs: A Quick Rundown of Vintage Models 1 & 2
I find the thrill of coming across a vintage Speedweve quite addictive to be honest! For the past few years I've been searching for them and in that time I've come across quite a few different models. I often get asked about the difference between the two main Speedweve models known as Model 1 and Model 2 produced in the U.K. between the 1930s and 1950s. In an attempt to make it easy to identify what model you have or what might be suitable for you to purchase, I thought I'd write a short post about it. So, if you're lucky enough to discover one with its original instructions or better still in its original box then you'll be able to quickly identify which model you have in your hands. Just take a look at the cover of the box: most likely it will say 'Model 1' or 'Model 2'. Or, cast your eyes over the printed instructions; it will probably be written at the top of the sheet or front cover. However, let's not forget many of these fabulous tools have probably passed through many hands before they found at home with you and so might have lost a few parts along the way. If you have no box or instructions then sometimes you can find the model number (1 or 2) stamped on the back of the metal loom part. Failing all that, then a simple glance at the front of the loom will give you a few clues! Firstly Model 1 was designed with a side sliding mechanism with an internal rocker that enables you to flip the hooks from the left to the right and vice versa with a simple push of the slider. The Model 2 which was produced after Model 1 has a much simpler exposed hook design. To flip the hooks you simply run your fingertips along the hook loops and in turn the hooks will move left and right quite freely. Hmmm....now what difference does that make I hear you say?! Well, in my experience when it comes down to it neither one is better than the other, except if you have dexterity issues. If you do then I would definitely opt for a Model 2 as sometimes the slider on the Model 1 can be a little stiff and requires a bit more pressure to be applied in order to move the hooks. The majority of Model 2 looms have loose, free-moving hooks that easily slide but this can pose another small issue....read on! When adding in the warp threads it is easier if you can place the hooks in the central position (not leaning to the left or right) but as Model 2 looms have looser hooks this isn't always possible. Once you insert your warp threads this isn't really an issue at all as the tension of the thread holds the hooks in position so if you move the loom around they wont flip on their own. If you are thinking you might want to explore different pattern options beyond a straightforward basket weave then having the ability to position the hooks centrally can be an advantage (by no means essential but is handy!). On a Model 2 there are a few DIY methods to do this; just inserting a thin stick through the hook loops should do it but can be a little fiddly. Don't get me wrong though, you can create a cast array of patterns using a simple basket weave (weaving over 1 vertical thread and then under 1 vertical thread) and different coloured threads in your warp and weft; at the end of the day this is what a Speedweve was designed to do!! Although in the modern world of visible mending many of us are exploring the many combinations of colour and weave patterns taken from traditional loom weaving to see what we can create and often this entails weaving beyond over 1/under 1 patterns. One final difference I'd like to draw your attention to is the curved lip at the bottom of the metal loom part. Occasionally you might find one that has no bent lip on the inside of the curved radius; rather it is still a flat piece of metal with a cut out curve. I have noticed this present on both Model 1 and Model 2 looms but more so on Model 1's and earlier (yet to be patented) models. I believe the curved lip was added to ensure a more secure fit within the groove of the wooden disc when held in place with an elastic band but in truth it makes very little difference. In fact all the new replica models have no bent curved lip either! There you go; a quick run down of Model 1 and Model 2. I really hope you enjoyed reading this post and it answered any questions you had, but feel free to comment below if you need more advice. Do you fancy picking up a vintage Speedweve (without the endless hours of searching and eBay bidding!) then hit the link below!!
- 14 hook vs 10 hook looms....which one is best for you!
Do you want to have a guess at the question I'm most frequently asked on social media and regularly pops into my inbox? Well, it's always a question in some form relating to the difference between a 10 hook and 14 hook loom. "Can you tell me the difference between a 10 hook and 14 hook loom? Which one should I buy?" After lots of practice using many different versions of these fabulous little machines and hours of cleaning up vintage models I've noticed there are many differences between the two. It's important to be aware of these differences when darning with one, so I decided it was about time I write a blog post dedicated to this topic. When searching for a Speedweve loom you may come across both vintage and replica (new) models with 10, 14, 16 or even 21 hooks (although you'll most commonly find 10 or 14 hook looms). The design of vintage models can vary depending on their age and where it was originally manufactured. Within this article I will refer to the vintage 10 hook and 14 hook looms produced in the U.K. between the 1930s and 1950s (both Models 1 and 2) known as a Speedweve or 'Lancashire's Smallest Loom'. New replica models also differ slightly so I will focus on the 14 hook model I sell in my own online shop. These are produced using original vintage machines which back in the day made a version of the Model 2 Speedweve sold in Russia/Soviet Union in the 1960s. Ok! So, let's get to it! There are 4 main differences which are as follows: size of the hook ends spacing between the hooks width of the darning area and number of hooks! A vintage 10 hook loom has: slightly larger hook ends. wider spaces between each hook. and a narrower darning area: approx. 43mm. "But, what difference does that make?", I hear you ask! the larger hook ends will allow you to darn using thicker thread or yarn. the larger hook spacing and fewer number of hooks will create a slightly looser weave. your finished patch will be slightly narrower if you use all 10 hooks vs 14 hooks (approximately 2-5mm). and fewer hooks gives you a little less flexibility to play with colour and pattern as you're finished patch will have 8 less vertical (warp) threads and fewer horizontal (weft) threads as you need to use thicker thread/yarn. If you'd love to start repairing a precious wool coat which has had a full blown attack from some naughty moths, or your favourite hand-knitted jumpers and socks, then this is the loom for you! It's equally suitable for working on heavier fabrics and household items e.g. blankets and towels. Now, let's get on to the 14 hook loom. This has: slightly finer hook ends. a darning area that measures between 45mm and 48mm across; a vintage 14 hook loom has a very slightly wider hook spacing and therefore wider darning area. narrower spaces between each hook. "So, what does that mean?" the finer hook ends will allow you to darn using finer thread, but not yarn unless it's quite fine e.g. laceweight. the closer hook spacing will create a slightly denser/tightly woven patch. your finished patch will be slightly wider if you use all 14 hooks. and you can have a bit more fun with colour as you have more vertical (warp) and horizontal (weft) threads. [Image: Replica 14 hook loom pictured on the left and a Vintage 14 hook loom pictured on right] A 14 hook loom is the one for you if you dream of repairing denim, cotton or linen; essentially anything that is fine or medium weight rather than thick or heavy fabrics. Whatever loom you choose I can be sure you're going to have hours of fun creating all sorts of pattern and colour combinations whilst prolonging the life of some of your favourite garments and saving them from landfill. If you found this article helpful then please feel free to share it with your fellow menders and if you have any questions then pop a comment in the box below! Click on the links below to take a look at some of the products featured in this article:
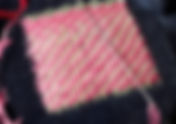
- 2 x 2 Twill Pattern
Do you fancy trying a new pattern? I've been exploring different weave patterns lately beyond a simple plain darn that is perfectly suited to a Speedweve. I started off with something a little simple and was blown away with the finished result - so much so I just had to share it with you all! Under 2, Over 2 The basis of this pattern is created in the weft (horizontal lines). Remember weft sounds like left so it refers to the lines of thread running left to right, and the vertical (up/down) threads are known as the warp threads. To create this pattern you simply weave over and then under two threads at a time which magically creates diagonal lines. First Steps This pattern can be created with or without a Speedweve loom; however using a Speedweve tends to give a neater finished darn. Begin by inserting your warp threads. It's easier (but not essential) if you can add an even number of warp threads in multiples of 4 when it comes to following the pattern i.e. 4, 8, 12, 16, 20, 24, 28 and so on. And if you use just one colour for your warp threads then it makes the overall effect much more striking, but feel free to experiment. Once you're done you're ready to start creating the twill pattern within the weft threads. Weft Threads This pattern is made up of 4 rows which are then repeated until you've covered the area you need to repair or reached the bottom of the Speedweve hooks. For those of you who are confident reading weaving patterns then the above diagram should be straightforward. I've made it available as a free PDF download (see the link at the bottom of this post) which you use as an electronic version or print out if you would prefer. For those of you who are thinking "Where on earth do I start?!" then don't panic, I've got it covered- just scroll down to the next image!! All you need to do is simply follow these written instructions and return to the first line after you've completed 4 rows. You can stop at any point - you don't have you finish a row of 4 if you run out of space. If you do forget what point you've got to in the pattern it's easy to work it out, all you need to do is count the number of rows you have from the bottom up and then divide it by 4. Alternatively, look at the pattern you created on your last row and compare it to the written instructions to work out your next row. Tips! It's much easier if you stick to a square or rectangle shape for your darn rather than a circle or anything else more fancy - any shape with uneven sides will mean you will need to adjust the point at which you start the pattern. If you want to change the colour of the weft threads then perhaps do so after every 4 or 8 rows. If you're using a Speedweve I would recommend you keep the hooks in the upright position as opposed to sliding them left or right after each row. By keeping the hooks in the upright position it makes it easier to weave over and under individual threads. At the beginning the pattern is not too obvious but usually by the time you've completed the first 8 rows the pattern becomes much more apparent. Try to choose two or more contrasting colours if you want to create a 'Zinger' - a weave with impact!! Click here if you'd like to watch a full tutorial video: https://www.youtube.com/watch?v=aXSmEOxNIr0&t=560s Click here for a free PDF pattern download: Check out my Instagram page for lots more inspiration: https://www.instagram.com/ministryofmending/